We Got On The Red French Tips Train & Designed The Freshest Fruit-Inspired Summer Manicure
There's something strangely satisfying about a clean, crisp French manicure — and a red French manicure is even better. Red French manicures provide clean, sophisticated lines and a pop of bright, cheerful color, so they're the best of both the classic and colorful worlds. Moreover, the chic combination of red and pink is universally flattering and works with virtually any base coat or shade of nail polish. Red French manicures also serve as the perfect foundation for super trendy summer fruit nail art. The only caveat? Custom nails at the salon can get pricey rather quickly, and good nail techs are hard to find. Unfortunately, as many of us know, there's nothing worse than spending hard-earned bread on a lackluster French mani.
But fear not, fans of fabulous nail art. You can get that gorgeous red French mani you've been eyeing on your feed in the comfort of your own home. All it takes is a few simple products to get started — and don't worry if you're no pro at wielding a nail polish brush. I'll walk you through the basics of painting red French nails and even show you how to enhance them with some fun summer designs with gel polish or traditional lacquer. Whether you're leaning toward the cherry manicure trend or you're more of a strawberry babe, Gliz's got you covered with this quick and easy guide to the best red French manicure ever.
Products you'll need for a perfect red French manicure

You likely already have everything you need to paint red French nails using traditional lacquer. For professional-looking results, you'll need a cuticle trimmer, oil, file, and moisturizer before tackling the rest of your list. From there, look for a clear base coat; a semi-sheer neutral shade in pink, beige, or taupe; and a cherry-red nail polish. Any brand will do, though I've personally had success with Essie, OPI, and Olive & June if you're looking for durable, quick-drying shades. A thin nail brush is also essential for crafting a crisp-looking French mani, and you can find one at your local beauty supplier. Finally, you'll need a glossy, clear top coat — I like the cult-classic, super-shiny Seche Vite Dry Fast Top Coat for traditional lacquer manicures.
For gel, you'll need the basic manicure tools listed above, though your polish list will vary slightly. In addition to staples like gel-cleansing solution and lint-free cotton pads, pick up a clear base coat. Or, try using a peel-off base instead: Madam Gliz's Peel-Off Base Coat allows you to play with any gel color you choose with easy removal and no damage to your natural nail beds. Then, grab a base coat or builder gel in a natural shade and a red gel polish or painting gel. If you're looking to add some fruit nail art to your red French mani, don't forget gel polish in green and white, plus yellow for painting strawberry seeds.
How to paint a red French manicure at home

As with any great set of nails, a picture-perfect red French manicure starts with a solid foundation. Begin by trimming away any fraying cuticles — as fun as it is to pick at them, they just don't look great on camera! Next, file your nails (or artificial nail tips) to your desired shape. Classic French manicures typically feature rounded or almond nails, though you can experiment with fun styles like square, squoval, or duck nails.
Now, you're ready to get cooking. Paint on a thin layer of your base coat and allow it to dry or cure under UV light fully. If using gel, be sure to treat each layer of base coat, polish, or top coat with cleansing solution and a cotton pad — I like to include this step whether or not a polish is "no-cleanse" as a precaution. Next, add on a coat or two of your neutral polish, making sure to cover the surface of the entire nail from base to tip.
After drying or curing said polish, it's time for the fun part: painting your red French tips. While French nails can look intimidating, they're actually not that hard to nail (pun intended). The trick is to use a thin brush dipped in the red polish of your choice to create the sharp curve of your tip. From there, use the full-sized polish brush to fill in the rest of your tip, making sure to coat the edge and underside of the nail to ward off premature chipping. You can also try this method the other way around if it's easier, using a full-sized brush to paint the bulk of your French tip and refining its shape with a thin brush.
How to add strawberry nail art to your red French manicure

In terms of summer trends, you can't go wrong with a set of strawberry nails or cherry nail art alongside your red French mani. If you've never painted your own nail art before, you might want to practice on some blank tips, a sheet of paper, or a willing victim before trying them on your own nails. But if I'm being perfectly honest, fruit-inspired nails are fairly easy to pull off compared to other types of nail art. For cherry nails, you'll need red, green, and white polish. Strawberry nails require the aforementioned shades, though yellow is a highly recommended accent color for painting true-to-life strawberry seeds.
Aside from that, make sure you have a thin brush or two, some cotton pads or paper towels, and a capful of nail polish remover or gel cleansing solution to clean your brush between colors. You'll also want to line up your clear gel top coat or traditional top coat lacquer to seal your design. Not only will a clear top coat tie everything together with its sleek shine, but it will also help protect your precious nail art against chips, dings, and damage.
How to perfectly pull off the cherry manicure trend

For cherry nails, start by painting your stem. This is essentially a slanted "Y" shape with a slightly exaggerated tip. Don't worry if it isn't perfect; you're adding cherries on top, remember? At the top of your stem, paint a little cherry leaf on the side, which can be as simple as a drop of green polish or curved for a more realistic shape. Next, add a drop of red polish for each cherry, and voila! Your cherry nails are pretty much complete, though you can add some tiny drops of white for a juicy-looking highlight. And whether you're painting cherries or strawberries, don't forget to finish them with a thin layer of clear gel top coat or traditional top coat lacquer!
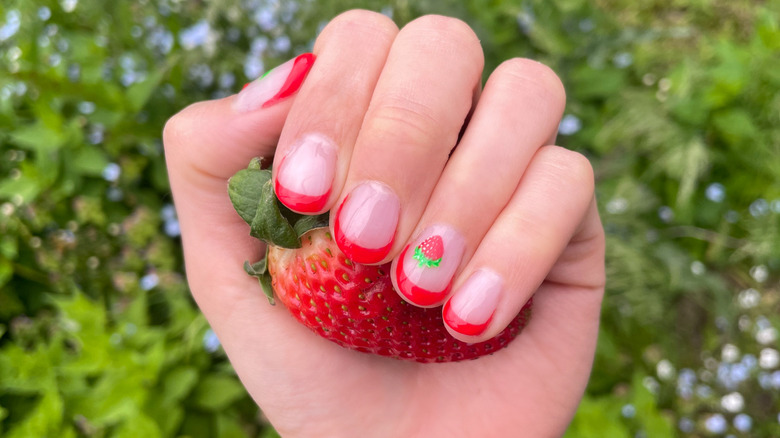
Strawberry nails follow a similar process, though you'll paint your red polish layer on first. After carefully brushing on a rounded strawberry shape, follow it up with a hint of green for your strawberry leaves. Last but not least, use the very tip of your nail brush to carefully dot on some tiny yellow seeds over your red fruit base. To really make your strawberries pop, use a small speck or two of white polish as a highlight to enhance the leaves and berry. Now that you've got some gorgeous fruit nail art on your red French manicure, it's time to show them off — the farmer's market or produce aisle might be just the place to get noticed!